
Just the other day I realized that I can’t find an awful lot of my jewelry. While trying to decide what to wear from my 1 necklace and 2 pairs of earrings I got frustrated. So I started digging through moving boxes because I’ve not quite unpacked my stuff here at the house, yet. And STUFF just keeps appearing at the house. It comes from my parents’ house and it comes from storage units and it just. keeps. coming. Granted, it’s MY stuff and it belongs here, but it feels so darn frustrating that I can have so much STUFF all freaking around me and but never the STUFF that I need. Doesn’t that just beat all?
And on this day I really wanted to wear a necklace. But not necessarily the chunky 3 strand of pretty gray pearls my sister gave me for Christmas, also known as the only necklace I can currently find. Also, also known as WAY TOO MUCH to wear with a tee shirt that reads “Heifer, please”. <- also a gift from my sister.
You are watching: DIY Stamped Lucky Penny Jewelry
Frustrated by the fact that right now I cannot seem to find a single dang thing I need when I need it I kind of lost it.
And then my parents popped by with even. more. stuff. From kitchen gadgets, to crochet hooks, to medicine, to Echo Dots missing their cords it’s just a bunch of stuff that needs sorted before it can even be dealt with. It’s Christmas trees with lights all jacked up tangled INSIDE of them I have to untangle so I can box them up. It’s stuff molded from a flooded storage unit I need to decide if I want try to save or just toss. The general state of my STUFF has me a weensy bit stressed out 🙂
But, luckily, I have a pretty awesome job as a craft blogger. One day sitting in my office full of boxes half strewn all over the floor (from looking for, you guessed it, STUFF 🙂 I decided I would MAKE myself a necklace with whatever stuff I COULD find. And boy do I ever hoard loose change…

With a little luck…
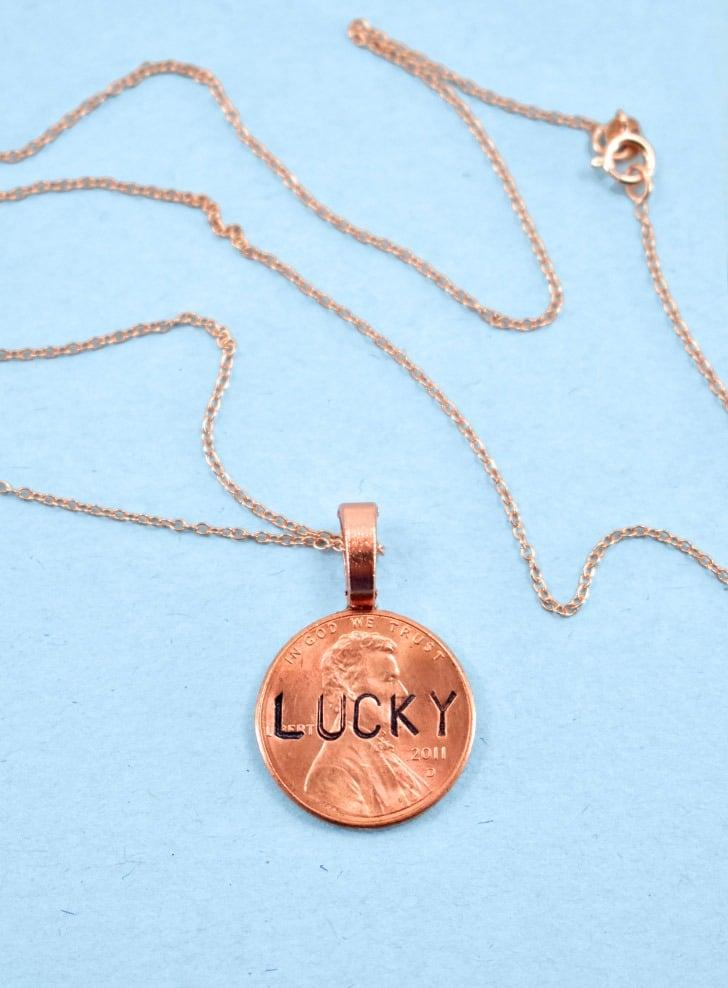
I sat down with a piece of paper and decided I liked the idea of making a penny necklace most of all. And what’s more I wanted to stamp “LUCKY” on it. Because while I don’t currently feel particularly lucky today (amid a bunch of STUFF strewn about) I still know that I am. There is a roof over my head and it is a place to call my own. I have a dream job that I love. And family that will haul my crap around town for me. Basically, even when I’m having a cruddy day know deep down that I am lucky.
Lucky enough that a lucky penny necklace sounds like just the accessory to wear on my good days. And it doesn’t hurt that it will remind me that I still have luck on the not so good 🙂
Want to make some lucky penny jewelry, too?
Before you get all up in my comments, cool it there, Cookie…
It is NOT illegal to make a penny necklace.
It WOULD be illegal if you tried to alter a penny coin to fraudulently pass it as, oh, I don’t know, a million dollar bill. <— And you’d deserve to wear bright orange for being dumb as all get out if you tried.
Section 331 of Title 18 of the United States code “fraudulently alters, defaces, mutilates impairs, diminishes, falsifies, scales, or lightens any of the coins coined at the Mints of the United States.” This statute means that you may be violating the law if you change the appearance of the coin and fraudulently represent it to be other than the altered coin that it is. As a matter of policy, the U.S. Mint does not promote coloring, plating or altering U.S. coinage: however, there are no sanctions against such activity absent fraudulent intent.
Besides if it does become illegal to make a penny necklace I’ll cop a plea because I know of TONS of penny smashing machines to rat on. Cool? Feel better that you won’t be breaking the law? Let’s pop out some so awesome it should be illegal but is totally actually legally awesome penny jewelry, then 🙂

Supplies Needed to make a DIY Stamped Lucky Penny Necklace
- a Pretty Penny (see 7 ways to clean pennies here)
- Rose Gold Chain Necklace
- Glue On Bails <- I picked out the rose gold from this variety pack
- Super Strong Glue
- Letter Metal Stamps <— I used these 4mm stamps
- Stamping Bench Block
- Heavy Hammer -> or a Metal Stamping Hammer
- Sharpie Permanent Marker
- Electric Tape
Read more : Wire Bound : Planners
I really love having lots of options for pendants when it comes to necklaces. As such I’ll have a few chains in my favorite length (I like 20″) in gold, rose gold and silver and then I’ll just slide the pendant I want to wear onto it. Since I have a really nice rose gold chain SOMEWHERE I purchased this really inexpensive one. It’s really lightweight but it’s really great quality for the price. If you don’t have anything rose gold and want to match your penny, I really couldn’t recommend it more.
If you’re going to be stamping metal a bench block is kind of necessary. The one I have isn’t expensive and it does a good job. You can, however, get one for around $7 at Michael’s with a coupon in store. A metal stamping hammer is nice but I can’t find mine. Instead I used one of my dad’s heavy as all get out hammers and it did well enough I wasn’t about to go buy another stamping hammer. If you want one, great, but if not you can do this with a hammer from the toolbox.

Prepping those Pennies
Shiny, pretty pennies really make this necklace pop, I think. I was able to find a few pennies that looked pretty much brand new right out of my change cup. But most of my pennies were pretty gunked up and needed to be cleaned. I did mention it in the supplies list above but just in case you missed it there are 7 ways you can clean pennies at home. You can use a combination of vinegar with salt or baking soda, ketchup, a pencil eraser, Brasso, citrus juice, or a nice refreshing glass of Coca Cola. Get the details for 7 ways to clean pennies right on over here.
How to Stamp a Lucky Penny Necklace

Tape down your penny onto your stamping block. I really like holding down my blanks and pennies using electrical tape. In the past I used masking tape but when you stamp on top of the tape accidentally the tape breaks away and forces itself into the indentation you made. Getting it out can be a whole thing with a needle or pushpin and I just don’t have the patience that I used to.
The tape also keeps your penny from scooting all over the place while you’re stamping. Plus it also gives you a nice, straight line to follow so that you can stamp your lucky letters out in a nice, straight line.
Since I’m right handed I like to work right to left when stamping rather than left to right. I’m not sure why, but I just typically get much better results. You can start from the left, the center, or the right side of the penny. Just do what feels right.
Stamping itself is pretty easy. You put the stamp onto the metal (impression side down) and then smack top of the stamp with your hammer. Easy does it… you don’t need to whack the daylights out of anything. And don’t forget, your hand is right there. Just give the stamp a healthy tap a few times and remove it from the surface.
Trouble shooting metal stamping pennies:

If you find that your letters are too shallow you’re not giving the stamp enough pressure. Maybe try hitting the stamp a little bit harder. Or just hit it a few more times.
If your letters are kind of fuzzy and blown out, you’re probably having some movement of your stamp or hands as you work.
If your stamp gets stuck inside of the penny or if the penny curves up around the stamp that’s way too much pressure. Either calm it down a bit and don’t hit the stamp as hard or hit it less times.
Read more : Xưởng in ly giấy – in tô giấy XANH
If the sides of your penny are bulging out so that it is no longer a nice, rounded shape, you need to bring your letters in closer together to keep them further from the edge of the coin.

What do you do if your stamped penny is bowed and doesn’t lay flat? Simply turn the penny over on your black and smack it back flat again.
Oh, and you see all of those pennies I stamped up there? Each attempt literally cost me a cent so I stamped and stamped until I was absolutely happy with the results I got. The rest of the pennies went back into my change cup. I figure at the end of the day, getting this penny for change might just make somebody’s day 🙂
Turning the Stamped Lucky Penny into a Pendant

If you want to make your stamped letters more visible you can fill in the letters with a Sharpie permanent marker. Going one letter at a time draw into the the indentation with your marker. Quickly buff away the excess in off of the surface of the coin. If you find you have ink in grooves you don’t want it you can use rubbing alcohol to carefully hit the bad spots. A cotton swab works perfectly for this.

Turning a penny into a pendant is easy with glue on bails. Above I have a few of the rose gold bails I plucked out of my value pack with different shapes and finishes. Though all of them will technically work I find the ones with more of the textured area hold the best.

Apply a small dot of really strong glue onto the textured side of the bail. I typically use e6000 but Gorilla brand has some good really strong glues, too. Allow the glue just a little bit to start drying and then press it onto the back of your penny. You have some time to sort of move the penny about if you need to better center it or scootch it over just a bit. Allow the pendant a few hours to dry but overnight is best.

I’m not going to lie, I love, LOVE this necklace so much right now. Maybe it’s because it is one of only 2 I can find, or maybe it’s because I’m lucky enough to have a lucky penny necklace 🙂

Source: https://antiquewolrd.com
Categories: Stamps